【AndroidTraining】Radio 1
Lesson
Radio 1
Mission
下記の仕様を満たすアプリを作りましょう。
- Radioボタンで選択した血液型を表示させる
Snap Shot

Step by Step
TrainingRadioActivityを新規に追加する- レイアウトファイルにRadioGroup, RadioButton, TextViewを追加する
- RadioGroup内の全てのRadioButtonに
onClick属性を追加する
<RadioButton
    android:id="@+id/radio_1_radio_a"
    android:layout_width="wrap_content"
    android:layout_height="wrap_content"
    android:onClick="onRadioButtonClicked"
    android:text="@string/radio_1_blood_type_a" />
4 . Viewを取得
mTextView = findViewById(R.id.radio_1_text_view);
5 . onClick時の実装を追加し、RadioButtonのidを判定して、血液型を表示するようにする
public void onRadioButtonClicked(View view) {
    switch (view.getId()) {
        case R.id.radio_1_radio_a:
            mTextView.setText(R.string.radio_1_blood_type_a);
            break;
        case R.id.radio_1_radio_b:
            mTextView.setText(R.string.radio_1_blood_type_b);
            break;
        case R.id.radio_1_radio_o:
            mTextView.setText(R.string.radio_1_blood_type_o);
            break;
        case R.id.radio_1_radio_ab:
            mTextView.setText(R.string.radio_1_blood_type_ab);
            break;
        default:
            break;
    }
}
Code
Radio 1 · atuyan39/AndroidTraining@dd0302e · GitHub
Reference
Memo
最初、onRadioButtonClickedというInterfaceがあると思ったけど違った。
onClick属性で呼ばれるメソッドを共通化することができると知れた。( ..)φメモメモ
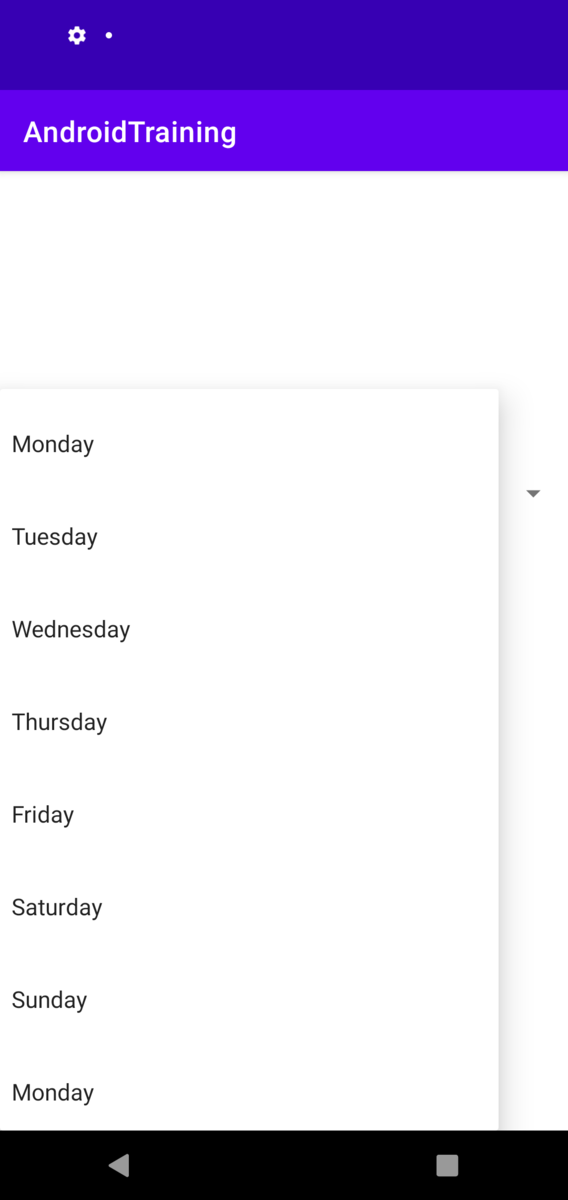
【AndroidTraining】Spinner 1
Lesson
Spinner 1
Mission
下記の仕様を満たすアプリを作りましょう。
- Spinnerから選択した曜日を表示させる
Snap Shot

Step by Step
TrainingSpinnerActivityを新規に追加する- レイアウトファイルにSpinner, TextViewを追加する
- Viewを取得
TextView textView = findViewById(R.id.spinner_1_text_view);
Spinner spinner = findViewById(R.id.spinner_1_spinner);
4 . SpinnerにセットするAdapterを作成する
ArrayAdapter<CharSequence> adapter = ArrayAdapter.createFromResource(this,
        R.array.spinner_1_array, android.R.layout.simple_spinner_dropdown_item);
adapter.setDropDownViewResource(android.R.layout.simple_dropdown_item_1line);
5 . Spinnerの項目が選択された際のリスナーを登録する
spinner.setOnItemSelectedListener(new AdapterView.OnItemSelectedListener() {
    @Override
    public void onItemSelected(AdapterView<?> parent, View view, int position, long id) {
        CharSequence selected = (CharSequence) parent.getItemAtPosition(position);
        textView.setText(selected);
    }
    @Override
    public void onNothingSelected(AdapterView<?> parent) {
        // nop
    }
});
6 . SpinnerにAdapterをセットする
spinner.setAdapter(adapter);
Code
Spinner 1 · atuyan39/AndroidTraining@63481ba · GitHub
Reference
Memo
アイテムの数が多いと、ちゃんとスクロールできるようにしてくれる。親切。
【Android講座】第1回 TextView, Buttonの基本的な使い方
Lesson 1で学ぶこと
- パーツ(TextView, Button)について
- 新規Activityの追加について
- レイアウトの配置の追加・修正の方法について
- Step by Stepで実装
↓ Lesson1 アプリ
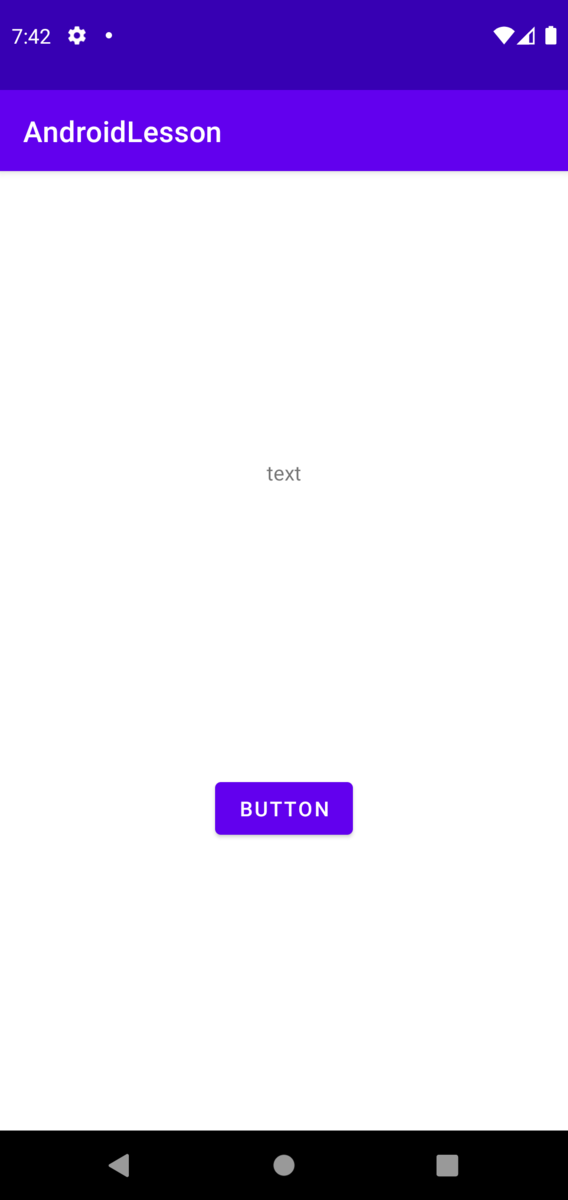
パーツについて
TextView
テキストを表示するView
- テキストを設定するメソッド
public final void setText (CharSequence text)
Button
Buttonを表示するView
- ボタンを押下時のリスナーを登録するメソッド
public void setOnClickListener (View.OnClickListener l)
※View.OnClickListener
interface。Viewが押下された際に、onClickを呼ぶ。
public abstract void onClick (View v)
View.OnClickListener | Android Developers
Lesson 1 Step by Step実装
基本の流れ
- 画面作成(Activityやlayoutの追加)
- 画面調節(パーツの追加や位置調節)
- イベント処理(ボタン押下された等)
- 画面更新(表示する、消去する等)
画面作成
パッケージ配下に、EmptyActivityを追加

自動でActivityとレイアウトxmlを追加

画面修正
TextViewとButtonを配置する
<?xml version="1.0" encoding="utf-8"?>
<androidx.constraintlayout.widget.ConstraintLayout xmlns:android="http://schemas.android.com/apk/res/android"
    xmlns:app="http://schemas.android.com/apk/res-auto"
    xmlns:tools="http://schemas.android.com/tools"
    android:layout_width="match_parent"
    android:layout_height="match_parent"
    tools:context=".Lesson1Activity">

    <TextView
        android:id="@+id/lesson1_text_view"
        android:layout_width="wrap_content"
        android:layout_height="wrap_content"
        android:text="@string/lesson1_text"
        app:layout_constraintBottom_toTopOf="@+id/lesson1_button"
        app:layout_constraintEnd_toEndOf="parent"
        app:layout_constraintHorizontal_bias="0.5"
        app:layout_constraintStart_toStartOf="parent"
        app:layout_constraintTop_toTopOf="parent" />

    <Button
        android:id="@+id/lesson1_button"
        android:layout_width="wrap_content"
        android:layout_height="wrap_content"
        android:text="@string/lesson1_button"
        app:layout_constraintBottom_toBottomOf="parent"
        app:layout_constraintEnd_toEndOf="parent"
        app:layout_constraintStart_toStartOf="parent"
        app:layout_constraintTop_toBottomOf="@+id/lesson1_text_view" />
</androidx.constraintlayout.widget.ConstraintLayout>
イベント処理
ボタンが押下された際の処理を追加
    @Override
    protected void onCreate(Bundle savedInstanceState) {
        super.onCreate(savedInstanceState);
        setContentView(R.layout.activity_lesson1);

        // パーツのViewを取得
        TextView textView = findViewById(R.id.lesson1_text_view);
        Button button = findViewById(R.id.lesson1_button);

        // Buttonをクリックした際の処理を追加
        button.setOnClickListener(new View.OnClickListener() {
            @Override
            public void onClick(View v) {
                // Buttonがクリックされると、View.OnClickListener#onClickが呼ばれる。
                // ボタン押下時の処理を追加
            }
        });
    }
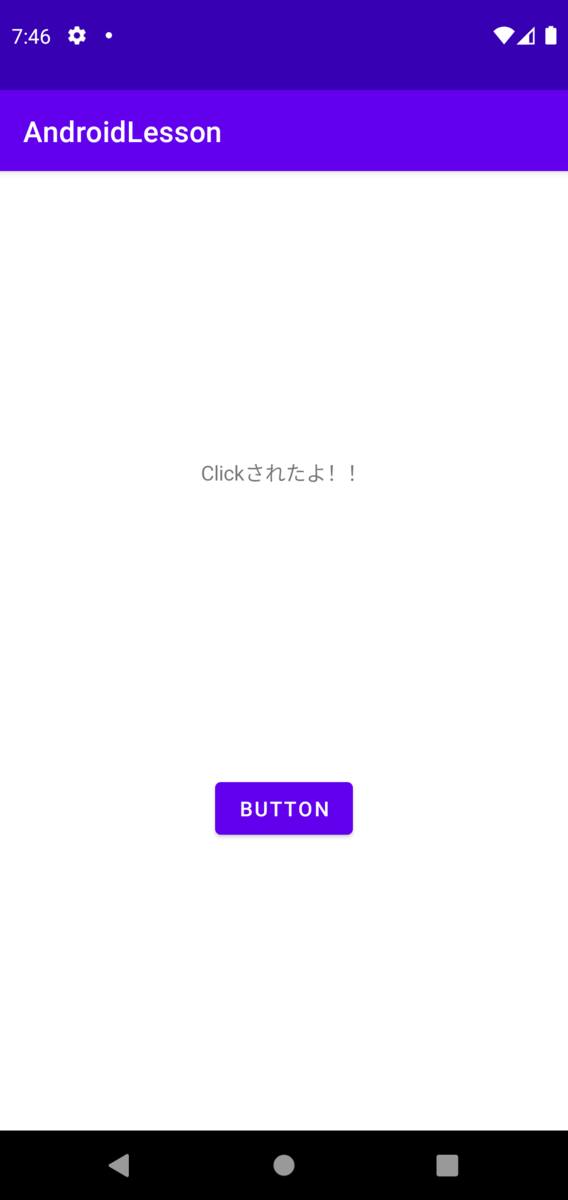
画面更新
TextViewの文字を変更する
textView.setText("Clickされたよ!!");
code
【Android講座】第0回 趣旨説明、AndroidStudioの導入とアプリ作成
本講座の背景・目的・目標
◆背景
開発初心者がAndroidを体系的に学べる教材がなかったので、なんとかしたい。
◆目的
◆目標
- Androidアプリを一人で作れるようになる
※注意点
本講座で使う開発言語は、現時点でjavaになります。
今後、Androidの体系化が進んでいく中で、kotlinやFlutterへの展開も行いたいと考えています。
Android Studioのインストール
アプリの作成
- Android Studioを起動
Create New Projectを押下- プロジェクトの情報を入力して、
Finishを押下
Name:AndroidLesson
PackegeName :com.examle
Save location : 任意
Language :java
Minuimum SDK :API 26
Empty Activityを選択して、Finishを押下
Emulatorの導入
※例)Pixel 4
- Toolsタブ > AVD Mangerを選択
+ Create Virtual Device...を押下- Phone > Pixel 4を選択して、
Nextを押下 - System Image(AndroidのVer)を選択、Downloadして、
Nextを押下 - 名前を決めて、
Finishを押下 - 作成したEmulatorの三角ボタンを押下して、起動
Androidの3大ファイルについて
※EmptyActivityのファイルの中身を確認
AndroidManifes
AndroidManifes.xmlを見る
<?xml version="1.0" encoding="utf-8"?>
<manifest xmlns:android="http://schemas.android.com/apk/res/android"
    package="com.example">

    <application
        android:allowBackup="true"
        android:icon="@mipmap/ic_launcher"
        android:label="@string/app_name"
        android:roundIcon="@mipmap/ic_launcher_round"
        android:supportsRtl="true"
        android:theme="@style/Theme.AndroidLesson">
        <activity android:name=".MainActivity">
            <intent-filter>
                <action android:name="android.intent.action.MAIN" />

                <category android:name="android.intent.category.LAUNCHER" />
            </intent-filter>
        </activity>
    </application>

</manifest>
javaファイル
MainActivity.javaを見る
package com.example;

import androidx.appcompat.app.AppCompatActivity;

import android.os.Bundle;

public class MainActivity extends AppCompatActivity {

    @Override
    protected void onCreate(Bundle savedInstanceState) {
        super.onCreate(savedInstanceState);
        setContentView(R.layout.activity_main);
    }
}
resファイル
drawable
画像を管理するフォルダ
layout
画面のレイアウトを管理するフォルダ
activity_main.xmlを見る
<?xml version="1.0" encoding="utf-8"?>
<androidx.constraintlayout.widget.ConstraintLayout xmlns:android="http://schemas.android.com/apk/res/android"
    xmlns:app="http://schemas.android.com/apk/res-auto"
    xmlns:tools="http://schemas.android.com/tools"
    android:layout_width="match_parent"
    android:layout_height="match_parent"
    tools:context=".MainActivity">

    <TextView
        android:layout_width="wrap_content"
        android:layout_height="wrap_content"
        android:text="Hello World!"
        app:layout_constraintBottom_toBottomOf="parent"
        app:layout_constraintLeft_toLeftOf="parent"
        app:layout_constraintRight_toRightOf="parent"
        app:layout_constraintTop_toTopOf="parent" />

</androidx.constraintlayout.widget.ConstraintLayout>
values
画面の文字や色やテーマを管理するフォルダ
strings.xmlを見る
<resources>
    <string name="app_name">AndroidLesson</string>
</resources>
アプリの実行
Empty Activityを作成するとHello Worldと画面に表示するアプリが最初から作られています。
- Emulatorを指定して、緑三角のボタンを押下
→アプリのインストールを行ってくれます

まとめ
- AndroidStudioのインストールをしました。
- 今後Androidを勉強していくアプリを作成しました。
- Emulatorの作成とアプリが実行できるようにしました。
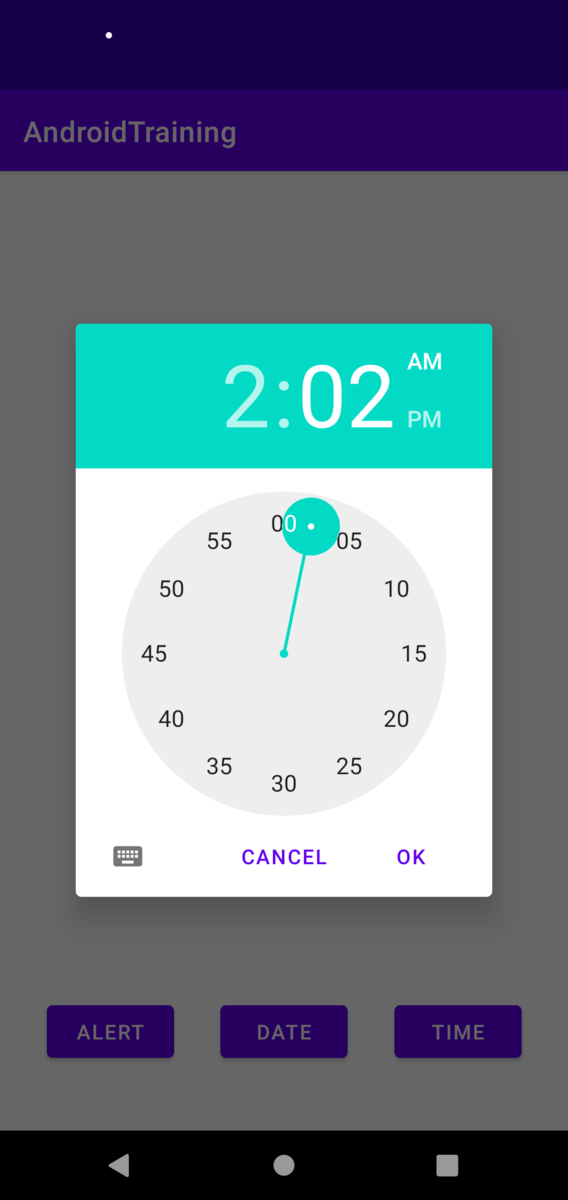
【AndroidTraining】Dialog 3
Lesson
Dialog 3
Mission
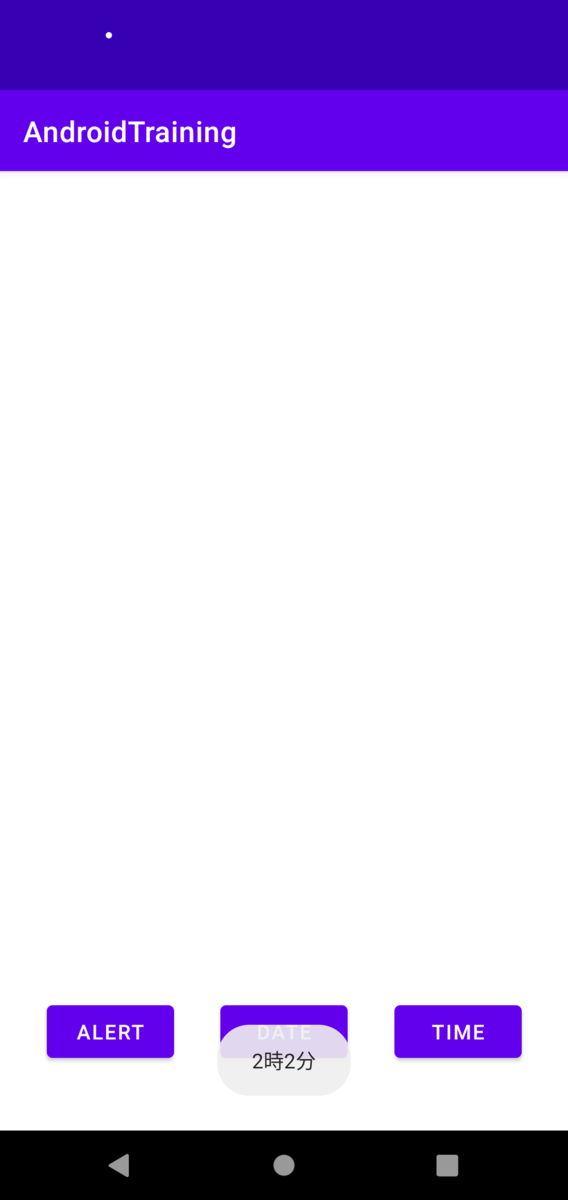
下記の仕様を満たすアプリを作りましょう。
- 時間ダイアログ(TimePickerDialog)を表示させる
Snap Shot
Step by Step
- Dialog 2を用意する
- Button(時間ダイアログを表示する)を追加する
- Buttonにクリックリスナーを追加する
- 時間ダイアログを作成する
  TimePickerDialog dialog = new TimePickerDialog(this, new TimePickerDialog.OnTimeSetListener() {
    @Override
    public void onTimeSet(TimePicker view, int hourOfDay, int minute) {
        // OKボタンが押下された際に通知が来る
        String message = hourOfDay + "時" + minute + "分";
        Toast.makeText(getApplicationContext(), message, Toast.LENGTH_SHORT).show();
    }
  }, 0, 0, true);
5 . 時間ダイアログを表示する
dialog.show();
Code
Dialog 3 · atuyan39/AndroidTraining@0ad71cd · GitHub
Reference
Memo
2時2分
【AndroidTraining】Dialog 2
Lesson
Dialog 2
Mission
下記の仕様を満たすアプリを作りましょう。
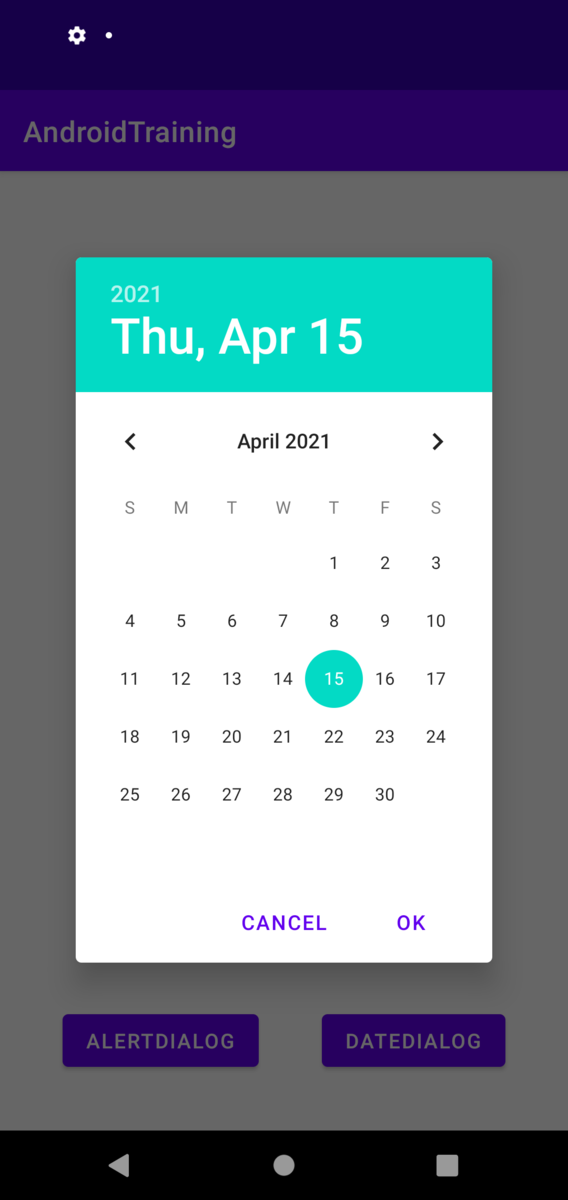
- 日付ダイアログ(DatePickerDialog)を表示させる
Snap Shot
Step by Step
- Dialog 1を用意する
- Button(日付ダイアログを表示する)を追加する
- Buttonにクリックリスナーを追加する
- 日付ダイアログを作成する
DatePickerDialog dialog = new DatePickerDialog(this);
5 . DataPickerDialog.OnDateSetListenerの処理を追加する
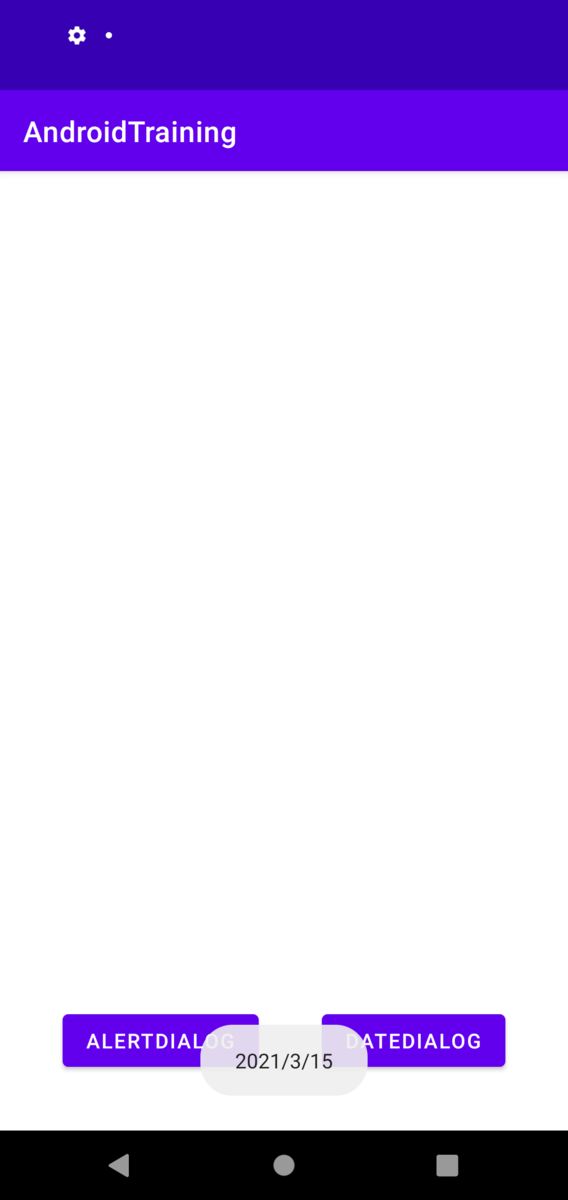
  dialog.setOnDateSetListener(new DatePickerDialog.OnDateSetListener() {
    @Override
    public void onDateSet(DatePicker view, int year, int month, int dayOfMonth) {
      // OKボタンが押下された際に通知が来る
      // トースト表示してみる
      String message = year + "/" + month + "/" + dayOfMonth;
      Toast.makeText(getApplicationContext(), message, Toast.LENGTH_SHORT).show();
    }
  });
6 . 日付ダイアログを表示する
dialog.show();
Code
Dialog 2 · atuyan39/AndroidTraining@4e6b886 · GitHub
Reference
Memo
知らないだけで既に提供されている機能やパーツが結構ある。知は力なり。
【AndroidTraining】Dialog 1
Lesson
Dialog 1
Mission
下記の仕様を満たすアプリを作りましょう。
- ダイアログを表示する
Snap Shot

Step by Step
- 新規に
TrainingDialogActivity.javaを追加する - Button(ダイアログを表示する)を追加する
- Buttonにクリックリスナーを追加する
- Dialogの処理を追加
  // Builderを作成する
  AlertDialog.Builder builder = new AlertDialog.Builder(this);

  // Dialogに表示する情報を設定する
  builder.setMessage(R.string.dialog_1_message)
         .setTitle(R.string.dialog_1_title);

  // AlertDialogを作成し、表示する
  AlertDialog dialog = builder.create();
  dialog.show();
Code
Dialog 1 · atuyan39/AndroidTraining@d0a7169 · GitHub
Reference
Memo
DialogとかPopupとか統一してほしい